NetworkXとGraphvizによる二分探索木の可視化をやってみます。探索木の実装は高速化のためJavaで行います。
目次
Node<T>クラス
整数以外も使用できるようにComparableタイプを扱います。
public class Node<T extends Comparable<T>>{

    private T data;
    private Node<T> left;
    private Node<T> right;

    public Node(T data){
        this.data = data;
    }
    public Node(T data,Node<T> left,Node<T> right){
        this.data = data;
        this.left = left;
        this.right = right;
    }

    public T getData() {
        return data;
    }

    public void setData(T data){
        this.data = data;
    }

    public Node<T> getLeft() {
        return left;
    }

    public void setLeft(Node<T> node){
        this.left = node;
    }

    public Node<T> getRight() {
        return right;
    }

    public void setRight(Node<T> node){
        this.right = node;
    }

}
探索木クラス
慣れてきたので一気に実装します。
import java.io.File;
import java.io.FileWriter;
import java.io.IOException;

public class BinaryTree<T extends Comparable<T>> {
    private Node<T> root;
    public String btStr = "";

    public BinaryTree(Node<T> root) {
        this.root = root;
    }


    public Node<T> getRoot() {
        return this.root;
    }

    public void addAuto(T data){
        Node<T> currNode = this.root;

        while(true){
            if (data.compareTo(currNode.getData())>=0){
                if (currNode.getRight() != null){
                    currNode = currNode.getRight();
                }else{
                    currNode.setRight(new Node<T>(data));
                    return;
                }
            }else{
                if (currNode.getLeft() != null){
                currNode = currNode.getLeft();
            }else{
                currNode.setLeft(new Node<T>(data));
                return;
            }
            }
        }
    }

    public void out(Node<T> node){
        if (node.getLeft() != null){
            System.out.println(node.getData() + "->" +node.getLeft().getData());
            btStr += node.getData() + "->" +node.getLeft().getData() + "\n";
            out(node.getLeft());
            }
      if (node.getRight() != null){
            System.out.println(node.getData() + "->" +node.getRight().getData());
            btStr += node.getData() + "->" +node.getRight().getData() + "\n";
            out( node.getRight());}
            else{
                return;
            }
    }


    public static void main(String[] args) {
        int[] arr = {19,21,22,25,16,13,7,34,24,5,31,9,2,48};
        BinaryTree bt = new BinaryTree(new Node(20));
        for (int i = 0;i<arr.length;i++){
            bt.addAuto(arr[i]);
        }
        bt.out(bt.root);

        try{
            File file = new File("./out.txt");
            FileWriter fw = new FileWriter(file);
            fw.write(bt.btStr);
            fw.close();
          }catch(IOException e){
            System.out.println(e);
          }
    }
}
void out で再帰的にルートノードから全要素を巡回します。
PSVM実行結果
テキストファイルに、以下のルートノードと左右の要素の関係を網羅した出力結果を記録します。
20->19
19->16
16->13
13->7
7->5
5->2
7->9
20->21
21->22
22->25
25->24
25->34
34->31
34->48
Pythonで可視化
out.txtを経由してPythonに探索木のデータを渡します。
NodeとEdgeの抽出
平坦化関数を作成して、データを加工します。
def flat(l):
    if l == []:
        return []
    else:
        if isinstance(l[0],int) or isinstance(l[0],str):
            return [l[0]] + flat(l[1:])
        else:
            return flat(l[0]) + flat(l[1:])

data = [i.replace("\n","") for i in open("out.txt").readlines()]

nodes = list(map(int,set(flat([i.split("->") for i in data]))))

edges = [tuple(map(int,i)) for i in [i.split("->") for i in data] ]
NetworkXによる可視化
import networkx as n
import matplotlib.pyplot as plt

#GraphD class
class GraphD:
    def __init__(self) -> None:
        #networkx object
        self.G = n.DiGraph()

#GraphD object
graphD = GraphD()

graphD.G.add_nodes_from(nodes)
graphD.G.add_edges_from(edges)

fig = plt.figure()
n.draw(graphD.G, with_labels = True,node_size = 300, width = 2,font_size = 10)
fig.savefig("result.png",dpi = 500)
実行結果

NetworkX側に探索木であることを伝えていないので、こうなりました。
確かに接続は合っていますが、綺麗な木にしたいのでgraphvizを使用します。
graphvizによる可視化
from graphviz import Digraph

G = Digraph(format="png")
G.attr("node", shape="circle")

for i,j in edges:
    G.edge(str(i), str(j))
G.render("bt")
実行結果

ランダムデータの生成
以下のようにして、ランダムな整数配列を生成し、二分探索木を可視化してみます。
import java.io.File;
import java.io.FileWriter;
import java.io.IOException;
import java.util.Collections;
import java.util.ArrayList;
public class BinaryTree<T extends Comparable<T>> {
    private Node<T> root;
    public String btStr = "";

    public BinaryTree(Node<T> root) {
        this.root = root;
    }


    public Node<T> getRoot() {
        return this.root;
    }

    public void addAuto(T data){
        Node<T> currNode = this.root;

        while(true){
            if (data.compareTo(currNode.getData())>=0){
                if (currNode.getRight() != null){
                    currNode = currNode.getRight();
                }else{
                    currNode.setRight(new Node<T>(data));
                    return;
                }
            }else{
                if (currNode.getLeft() != null){
                currNode = currNode.getLeft();
            }else{
                currNode.setLeft(new Node<T>(data));
                return;
            }
            }
        }
    }

    public void out(Node<T> node){

        if (node.getLeft() != null){
            System.out.println(node.getData() + "->" +node.getLeft().getData());
            btStr += node.getData() + "->" +node.getLeft().getData() + "\n";
            out(node.getLeft());
            }
        if (node.getRight() != null){
            System.out.println(node.getData() + "->" +node.getRight().getData());
            btStr += node.getData() + "->" +node.getRight().getData() + "\n";
            out( node.getRight());}
        else{
                return;
            }
    }


    public static void main(String[] args) {

        int n = 500;
        ArrayList<Integer> l = new ArrayList<Integer>();
        for (int i = 0;i<n;i++){
            l.add(i);
        }
        Collections.shuffle(l);

        BinaryTree bt = new BinaryTree(new Node(l.indexOf(0)));
        for (int i = 1;i<90;i++){
            bt.addAuto(l.indexOf(i));
        }
        bt.out(bt.root);

        try{
            File file = new File("./out.txt");
            FileWriter fw = new FileWriter(file);
            fw.write(bt.btStr);
            fw.close();
          }catch(IOException e){
            System.out.println(e);
          }
    }
}
実行結果
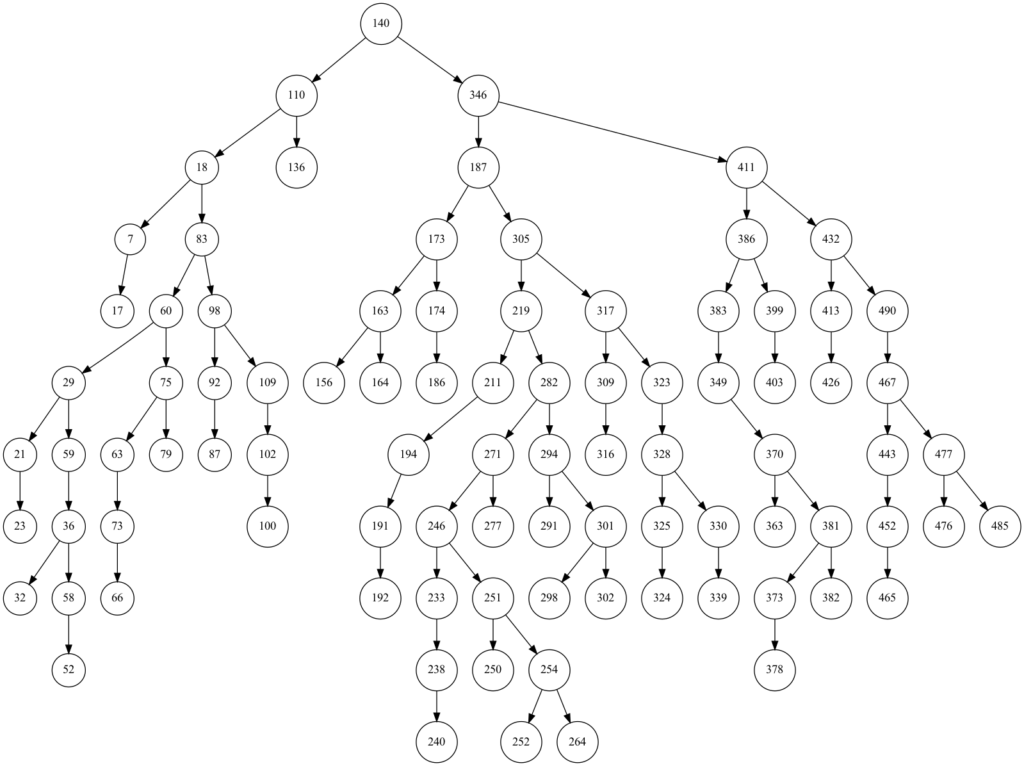
Maximum recursion depthエラーの回避
再帰の深さが大きくなってくると、それ以上深く進めないというエラーが出てきます。pythonのデフォルトでは999回の再帰呼び出しでエラーが呼び出されます。この上限を上げるのも一つの手ですが、二分探索木の場合のみ、イテラティブな方法で二次元配列を展開することにします。
例えば、text.txtに記録された10000個のランダムな整数配列があったとします。
これをイテラティブに展開すると以下のようになります。
data = [i.replace("\n","") for i in open("out.txt").readlines()]

nodes = [int(i.split("->")[0]) for i in data ] + [int(i.split("->")[1]) for i in data ]

edges = [tuple(map(int,i)) for i in [i.split("->") for i in data] ]
ついでに、10000個の整数を使用して探索木を作成してみます。
横長になりすぎて全部は表示できませんが、無事にアルゴリズムが働いてくれているようです。
二分探索木の反転
再帰を利用して、二分探索木を水平方向に反転させてみます。
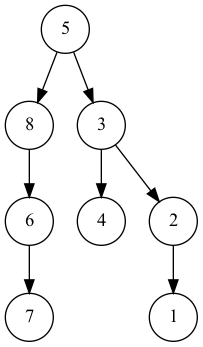
以下が元の探索木です。

反転するために以下のメソッドを作成しました。
public Node<T> invert(Node<T> node) {
        if (node == null) {
            return node;
        }else{
            invert(node.getLeft());
            invert(node.getRight());
            Node<T> tmp = node.getLeft();
            node.setLeft(node.getRight());
            node.setRight(tmp);
            return node;
        }
    }
実行結果
   public static void main(String[] args) {
        int[] arr = {5,3,8,2,4,6,1,7};
        BinaryTree bt = new BinaryTree(new Node(arr[0]));
        for (int i = 1;i<arr.length;i++){
            bt.addAuto(arr[i]);
        }

        bt.root = bt.invert(bt.root);
        bt.out(bt.root);

        try{
            File file = new File("./out.txt");
            FileWriter fw = new FileWriter(file);
            fw.write(bt.btStr);
            fw.close();
          }catch(IOException e){
            System.out.println(e);
          }
    }